Instant Gardening
Garden Arbours
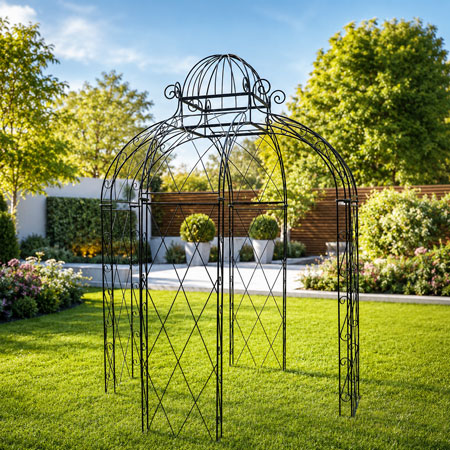
An arbour is generally a place to sit which is usually surrounded by plant material, and one very simple way to create this is to place an arch up against a tall hedge or a wall and grow plants up it. A trellis at the back will quickly clothe a wall, and then all you need is a suitable seat or bench. A single arch can sometimes look a bit too shallow in a good sized garden, in which case two arches arranged to give a deeper arbour will solve the problem.
The choice of plants to enclose your arbour is enormous, so first think about which type of plants to well in your soil, if the plants don't like their situation growth will be slow at best and you will have an unclothed arbour for several years. Roses and honeysuckle can be good choices in that they are scented which may appeal to you as you are sitting drinking you G&T before dinner. Roses will need to be closely trimmed or you may find the thorns being more of a curse than the scent is a blessing. If these don't appeal what about clematis, there are varieties which will flower in every season now, and hydrangea petiolaris is a strong grower which will soon provide the cover you want. There are also a good number of annual climbers which can give excellent service in the first couple of years whilst the permanent subjects are growing.
If you want more freedom in your arbour design that a pre-formed arch affords you can just as well use trellis panels attached to 75x75mm timbers sunk into the ground either using Metposts or concrete filled holes.
However you do the job you will generate a characterful place to sit as well as an attractive garden feature
Laying a New Patio
First decide where you want the surface of your patio to be. It must not be above the damp-proof course of your house wall, or you will get damp on the inside wall. If the level is to be above the level of the rest of the garden you must now decide how you will edge it – brick wall etc then build it! Any wall will need foundations, assuming it is less than 60 cms tall, about 8 cms of compacted rubble, topped by 5-6 cms concrete will be sufficient unless you have clay soil, in which case you need to double both these thicknesses.
The base for the patio needs to have 15 cms compacted rubble, topped off with 8-10 cms crushed limestone. As you spread the limestone keep checking that you are getting an even fall to ensure that the rainwater drains away from the house and onto the lawn or garden, or otherwise into a surface water drain. Keep back a barrowful of limestone for filling in low spots as you use a plate vibrator (from your local hire shop) to compact the limestone. The importance of getting this final surface flat and evenly sloping away from the house cannot be overstressed, a good surface will make laying the flags much easier.
Now it is time to start laying the flags. First make sure that any flags where people will enter or leave the patio will not be less than half a full size otherwise it will be unlikely to remain stable for long. When you are ready to start laying, run two lines of mortar (if your flags are larger then 500mm square then run three lines of mortar), one close to each edge of the first row, and then a generous half shovel in the centre of each flag. The mortar needs to be fairly dry. Ideally start next to the house wall and work away. Having got your first flag in place, ensuring it is true to both edges, tap it down with a rubber mallet, until it is at the right level and following your fall away from the house. Finally make sure that the edges of the flag are completely bedded on mortar.
Leave about a 1 cm gap (a number of 1 cm thick pieces of wood will be useful) between flags, then lay the next, tap it down, and using a long straight edge keep checking that the latest flag to be laid is straight and the patio surface is absolutely flat and falling away at a constant rate from the house.
As you get towards the edges you may well find you need to cut some flags this is the job for an angle grinder fitted with a stone cutting disc. Be careful, more people injure themselves with angle grinders than any other tool, be sure to use gloves and goggles as a bare minimum.
Finally when all the flags are laid, the gaps should be pointed (filled with mortar). Again this mortar needs to be fairly dry or it will stain the flags, but at the same time it does need to be wet enough to adhere to the flags and set firmly.
Fruit Cages
We have built two types of fruit cage, the first a large walk in one which worked well but did trap a couple of blackbirds till we let them out. The second is much smaller, easier and cheaper to make and works well for small areas or individual fruit bushes.
First the larger one, ours covered an area of 30m x 5m. We bought some half round tannalised fencing posts from a fencing contractor and used these every 2m around the edge of the cage, the posts were 8ft tall and were knocked 2 ft into the ground. We then bought some electrical conduit from B&Q, along with 4 corner sockets and enough connectors to join the lengths. We also bought the same number of clamps as we had posts to secure the conduit to the tops of the posts. Once you have joined the lengths and secured them you are ready to calculate the size of netting (plastic) you need. In our case this was 34metres x 9metres; make sure you get a suitably small mesh, birds will soon find their way through a larger size hole. When the mesh is over the frame and positioned so you have some lying on the soil at each side, it just remains to secure to the ground and this must be done very thoroughly, those pesky birds will soon find any small gaps you leave!
The simpler system is basically to make some wooden frames from 25mm x 35mm tannalised timber and cover them in 13mm (1/2 inch) mesh chicken wire using staples. What size you make these frames is determined by the size of the things you are trying to protect, we make two sizes 1m x 1m and 2m x 500mm. We use 5 of the 1m x 1m frames to protect our redcurrants and gooseberries, the longer ones are used for brassicas at planting out time, and then move on to protect strawberries when they come into fruit later on. The frames are joined together with two cable ties per length.
Garden Compound
A year or two ago we made a garden compound to hide from view things like a trailer that goes behind the mower and several ton bags that we had filled with leaves which will take a year or two to become leaf mould. We also found the job a good way of using up various lengths of old timber that had been lying around for a while
Firstly I cut the timber (75 x 50 mm) into 1250 mm lengths and put points on the end. The cut ends were stood in wood preserver overnight, and then turned over and the other end stood in the same for another night. Immediately after turning over the other faces were painted with the preservative.
The next job is to knock the uprights into the ground at approximately 500mm centres. As we have heavy soil and it was very dry when I did the job I made a small hole with a crowbar and filled it with water; after an hour the water had soaked in, softening the ground and it was possible to knock the posts in until there was 950-975 mms above ground level.
Finally use roll form screening you can choose the material from brushwood, bamboo or reed to run around the compound. Attach it to one upright with cable ties or staples, then pull it tight and straight to the next and fasten again and so on. Use three attachments per upright, one close to the top, one close to the bottom and one in the middle.
I left one section without screening as an entrance way, and then got two more pieces of timber, attached the missing length of screening to these, and attached them to the uprights each side of the entrance using two hooks and eyes on each post, one on the inside high up and one on the outside low down.
The completed compound looks good, and although you can still see the bags over the top the area is much tidier than it was.
Garden Style Wild Garden
This style probably only works in the countryside, it would just look untidy in an urban situation.
The wild garden is typified by long grass with mown paths. Large indigenous trees like beech, oak, ash and sycamore (not truly indigenous) rather than the more ornamental trees are required and natural shrubs like elder, honeysuckle, dog rose, buddleia and guilder rose can be used to create the shape and architectural background.
When planting give especial consideration to plants which are renowned for being wildlife friendly and create as many habitats for all types of insect, reptile and mammal as possible.
Drifts of naturalised bulbs such as snowdrops, daffodils, anemone and even wild garlic as long as you like the smell will give early season interest. This could then be followed by wild flower meadow interest or even a border of drifts of wild flowers, the border should not be over-weeded, significant areas of bare soil will soon dispel the wild effect.
Areas of different grasses can again add greatly to the interest, but be careful to choose the more natural varieties, definitely no reds or blacks!
In place of statuary and sculpture logs can be used either singly or in groups and piles of cut logs make an excellent home for wildlife. Arches and buildings should obviously be as rustic as possible
Seaside Garden
Areas of sand or gravel should be sparsely planted with seaside plants typically sea pinks and grasses. Gravel must be at the larger end of pebble size and should be neutral in colour in order to mimic shingle.
Paths and patios are probably best made from decking, and if raised up a few inches from the general garden area will give the impression that the tide may come in soon! Wooden posts at the side of the walkway that protrude just a few inches above the decking will also help give the right feel but if young children or less mobile people are expected do consider the safety aspects.
Tamarisk is a wonderful salt tolerant hedging plant. Otherwise rope dividers are characteristic.
Garden sheds can be given a coat of blue paint, and if they have a widow or two at the front and a small veranda could be mistaken for a bathing hut or small chalet.
Artifacts go a long way to finish the look driftwood is de rigeur, and anything that might be found on a beachcombing trip will feel authentic
Instand Garden Specimen Plants
Having got the design and the basic planting right, it is time to add in the specimen plants that will attract the eye and make people remember your garden. So there are two basic requirements here position and impact.
Positioning your specimen plants must be done from the points from which they will be most often appreciated, so if it is a winter flowering plant it will most likely be seen from the house or on the approach to the house. If it is a strongly perfumed plant it should be positioned wherever you will encounter it at the time of its flowering. You need a number of specimen plants as most will not have impact for the whole year, and you should try to avoid putting two (or more) in positions where they will be competing for attention.
The impact a plant has is usually a property of the plant itself, but think also about the background against which the plant will be seen, as this can make or break the overall effect. A specimen plant’s background needs to be either quiet and unfussy or else contrasting, but again uniform so as not to attract the eye from where it should be focussed. A very useful background to a flowering specimen is cineraria maritima whose grey foliage is a good foil for vibrant colour.
The number of specimen plants you will need depends on the size and design of your garden, six would be a good start in a normal sized garden. Try to mix the impact characteristics of flower, foliage, perfume, and architectural form. And do be sure to consider year round interest. If you are choosing a herbaceous plant to be a specimen, it may have more impact as a group, 5,7 or 9 depending on size and space.
So here are a few plants to get you started:
Bulbs: Crown Imperial
Scent: Roses, honeysuckle (there is a winter flowering one), nicotiana, lilac
Architectural: Rogersia, echinops (especially nitro), ferns
Climbers: White wisteria, clematis
Shrubs Cornus controversa or kousa, viburnum plicata, pyracantha (thorns!)
Trees: Cedar (if you have a spare acre or two), crab apple, prunus cerrula, magnolia
39 Instant Gardens
39 Instant Gardens 1 Plants for quick effect
Given that you have prepared your ground well weeds out, organic matter, bone meal and growmore added to the soil, then there are ways to make your garden look established very quickly. One of the most important is to choose plants which will grow quickly.
Trees that establish and grow away quickly include:
Crab apples, malus, good flowers in summer, fruit in Autumn, not too big.
Willows, salix, can be interesting in form, e.g. contorted, weeping. Catkins.
Sorbus, family includes whitebeam and rowan.
Indian bean tree, catalpa bignoides, very big leaves, white flowers and in good years big bean pods.
Shrubs for quick effect:
Hydrangea needs no introduction!
Elder purple and golden varieties, make your own elderflower drink (or wine from the berries).
Pheasants eye, also known as Himalayan honeysuckle, leycesteria. Dark red pendant flowers and berries in winter.
Philadelphus, mock orange, scented white flowers in early summer.
Viburnum, not quite so fast but bodnantense has fragrant flowers in winter.
Groundcover:
Geranium various species, mostly purple flowered, some red, few white
Alchemilla mollis, lady’s mantle, yellow green flowers and nice foliage.
Pulmonaria, especially good in shady spots, self-seeds profusely!
Bergenia flowers very early spring.
Other perennials:
Foxglove
Campanula but not if you have a wet heavy soil. Profusion of usually purple flowers.
Aquilegia, good in shade.
Day lily, hemerocallis.
Climbers:
Clematis, but not the winter flowering varieties. Can also be used as ground cover.
Honeysuckle, many are sweetly scented, variety of colours of flower. Can be hacked back when overgrown.